
Exploring Mesh with an AP-205H
Note: All APs used for this are actually IAP units, which can run with either the Aruba Instant controller or a campus controller. Campus APs prior to the more recent unified SKUs cannot connect to an Aruba Instant controller.
After Wireless Field Day 8, Aruba, a Hewlett Packard Enterprise Company™, generously provided the delegates with a variety of hardware to take a look it. It was quite the spread and a very impressive sampling of products. One of the devices I particularly like is the AP-205H 802.11ac access point. The AP-205H is intended for both hospitality and remote worker deployments. It can be powered through PoE, has 4 Ethernet ports, and can even provide up to 10W of power to another PoE device. It can be wall mounted, ideally at on a wall plate using the Ethernet port on the rear for uplink, or desk mounted with a stand.
I can see this unit being great in dorms, study rooms, and in hotels, however I decided to try something a bit different and turn it into a wireless bridge for my media devices. I have a home theater PC, a Roku, and a PS3 connected to the living room TV. The PC connects using a flaky 802.11ac USB adapter, the Roku has built-in 802.11n, and the PS3 only supports 802.11g. In my neighborhood, 2.4GHz is typically at 70% or more airtime usage, so performance leaves a bit to be desired. This would make moving everything to 5GHz a big win, as well. By moving all the devices to a mesh connected AP, we can reduce channel contention, move everything to 5GHz, and improve the overall network performance for all the devices. Also of important note, there is both an AP-205H and an AP-205. These have different form factors, so don’t forget the ‘H’! That said, you could also use the AP-205 to make a wireless bridge.

Given an existing IAP deployment, the first thing to do is add the AP-205H to the wired network so it can join the virtual controller. This did not work for me at first because the version of code on my VC was older than what the 205H required. I upgraded the firmware on both the 205H and the 225 I’m using as an uplink so they were on the same version. I had to upgrade them anyway, since the 802.11ac APs require 6.4.3.1-4.2.0.0 or later to support mesh operation. Worth noting is that Aruba Instant 4.1 and later default to having Extended SSID enabled, which will disable mesh operation. You may need to disable that feature to use mesh. This comes with the minor caveat that with Extended SSID disabled you are limited to creating six networks, but you weren’t going to do that, anyway.

After all the settings are in order and the 205H joins the controller and synchronizes the VC configuration, switching to mesh operation is easy. Just disconnect the wired uplink and wait. After a couple minutes you’ll see that the AP has rejoined the controller using Wi-Fi for the uplink. However, there’s still a couple more changes to make before you connect wired devices to the mesh AP. If you connect a device to Ethernet ports 1-3 at this point, that device will obtain a controller provided IP address and may be stuck behind a nonexistent captive portal. If you connect a device to Ethernet 0, you’ll find the mesh is disabled since the AP will just believe the wired uplink has just returned.
To enable the Ethernet 0 port to be used as a downlink port, select the AP in the virtual controller and edit it. Under the Uplink tab, you want to enable “Eth0 bridging.” You may need to reboot the AP for this to take effect.

To make sure your wired ports are bridging to the wireless, you also need to configure the rules for wired ports. This is accessed in the VC under the More menu and selecting the Wired option.

Now you can either create a new wired network profile or do what I did and just update the “default_wired_port_profile.” The correct settings are dependent on your environment and goals, but for this instance simplicity works fine. You also need to assign the wired ports to use the new/updated profile(s). Notice that the devices I have on my wired ports are listed in the Wired Users window.

Once your ports are set, you can edit your profiles to operate as you see fit. In the Wired Settings tab, make sure the ports are admin up and that the uplink setting is set to disabled.
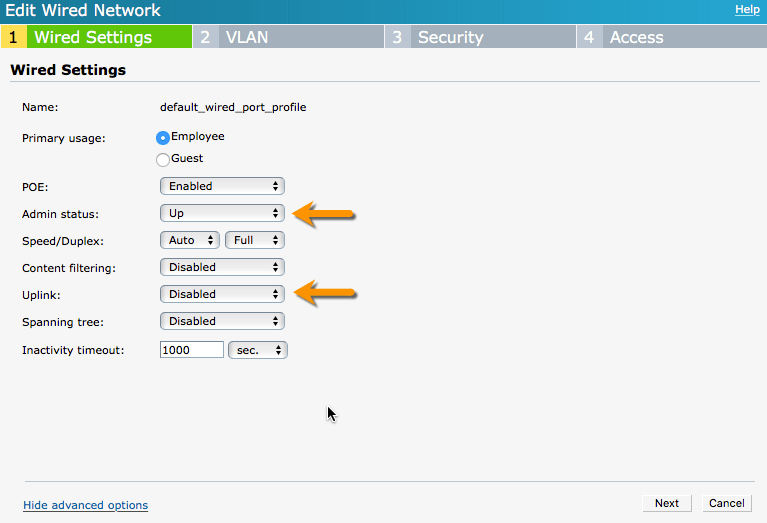
In the VLAN tab, make sure Client IP assignment is set to “Network assigned” unless you are using the VC’s internal DHCP server.

Now you can connect wired clients to the AP’s Ethernet ports and they will connect to the network through the Wi-Fi uplink. In mesh mode, the AP will continue to provide service to wireless clients, so you can also extend coverage in this way.
I hope you find this a useful little guide. This was a fun little project to solve a small problem. It helped me learn a bit about mesh operation in an Instant deployment and challenged me to implement something I’d not done before. That’s a great way to learn new things. Just pick something you haven’t done before and do it!
FIN
Hi,
Let me get this straight… the AP-205H works fine with the virtual controller provided by the IAP-205? You don’t need a separate controller?
The reason I ask is that I have a pair of IAP-205s, and would like to replace the uplink with a 205H. The AP-205H is on sale and considerably cheaper than the IAP-205H.
Cheers,
–Martin
Alas, no. A campus AP cannot connect to an Aruba Instant controller. An Instant AP can connect to either, as can the the newer unified APs (http://community.arubanetworks.com/t5/Technology-Blog/Aruba-Unified-AP-platform/ba-p/295661). Sorry for the confusion. I added a note to the top of the article to clarify for others.
OK. Thanks for the fast reply – and for a good blog post! :)
–Martin